Let me tell you about the day I stopped trusting labels.
I was building a set of built-in bookshelves for a client. The plans called for 3/4" plywood. I bought 3/4" plywood. I cut it. I assembled it. And nothing fit.
The shelves were loose in the dado slots. The face frame was proud of the cabinet sides. Everything was off by about 1/32" — not much, but enough to make the whole project feel sloppy.
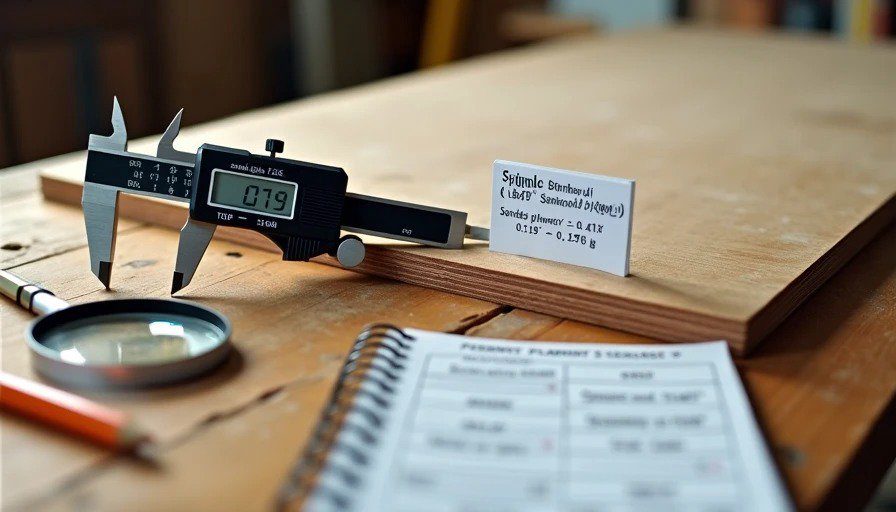
I grabbed my caliper. I measured the plywood.
0.719 inches.
Not 0.75. Not "about 3/4." 23/32 of an inch.
I'd been building things for eight years. I knew plywood was undersized. But I'd never actually measured it. I'd just accepted it as "how it is."
That day, I started measuring everything.
I measured lumber. I measured drywall. I measured screws. I measured tile. I measured paint. I measured everything I could get my hands on.
Here's what I found.
Find 1: The 3/4" Plywood Lie
Let's start with the big one.
What the label says: 3/4 inch (0.750")
What my caliper measured:
Plywood Type | Thickness (inches) | Thickness (mm) | Difference |
|---|---|---|---|
Sanded plywood (birch) | 0.719" | 18.3mm | -0.031" (-4.1%) |
Sanded plywood (maple) | 0.718" | 18.2mm | -0.032" (-4.3%) |
CDX sheathing | 0.703" | 17.9mm | -0.047" (-6.3%) |
OSB | 0.703" | 17.9mm | -0.047" (-6.3%) |
MDF | 0.750" | 19.1mm | 0.000" (0%) |
Only MDF measured true to size. Every wood product was undersized.
Why?
Plywood is sanded after manufacturing. The sanding removes material — about 1/32" total, spread across both faces. The manufacturer starts with a slightly thicker panel, sands it down, and sells it as "3/4."
The industry standard for "3/4" plywood is 23/32" (0.719") — not 3/4. That's the ANSI standard. But nobody puts that on the label. They just say "3/4" and hope you don't measure.
What this means for you:
If you're building cabinets with dado joints, your dados need to be cut for 23/32" plywood, not 3/4".
If you're matching existing 3/4" material, it's probably 23/32" too.
If you buy plywood from a big-box store and take it home expecting it to be 3/4", you'll be disappointed.
The exception: MDF and particleboard are not sanded after manufacturing. They're pressed to final thickness. So they actually measure 3/4".
Find 2: The 2×4 That's Not 2×4
This one's not a secret. Everyone in construction knows that a 2×4 is actually 1.5" × 3.5". But I measured anyway.
What the label says: 2" × 4" (50.8mm × 101.6mm)
What my caliper measured:
Product | Actual Thickness | Actual Width | Difference |
|---|---|---|---|
Kiln-dried SPF 2×4 | 1.50" | 3.50" | -0.50" (-25%) × -0.50" (-12.5%) |
Green (wet) 2×4 | 1.56" | 3.56" | -0.44" (-22%) × -0.44" (-11%) |
Premium kiln-dried | 1.50" | 3.50" | -0.50" (-25%) × -0.50" (-12.5%) |
The green (wet) lumber is slightly oversized. It shrinks as it dries to the 1.5" × 3.5" nominal size.
Why?
The "2×4" name comes from the rough-sawn dimensions before kiln-drying and planing. The drying removes moisture (and size). The planing smooths the surface (and removes more size).
What this means for you:
If you're buying lumber for a project, don't assume 2×4 is 2×4. Design for 1.5" × 3.5".
If you're matching existing lumber, measure it. Older (pre-1960) lumber is often closer to true 2×4.
Find 3: The Drywall Thickness Game
This one surprised me.
What the label says: 1/2 inch (0.500")
What my caliper measured:
Drywall Type | Thickness (inches) | Difference |
|---|---|---|
Regular 1/2" drywall | 0.495" | -0.005" (-1%) |
Moisture-resistant 1/2" | 0.498" | -0.002" (-0.4%) |
Type X (fire-rated) 5/8" | 0.620" | -0.005" (-0.8%) |
Premium "ultra-light" 1/2" | 0.490" | -0.010" (-2%) |
No drywall measured exactly 1/2". The ultra-light drywall was the worst offender — 0.490" is a noticeable difference when you're trying to match existing walls.
Why?
Drywall is manufactured to a minimum thickness, not a target thickness. The manufacturer can be slightly under the nominal size and still sell it as 1/2".
What this means for you:
If you're patching a hole, buy drywall from the same manufacturer as the existing wall. Different brands have different thicknesses.
If you're using a 1/2" drywall shim, it's actually 0.490-0.495". Factor that in.
This one matters. That 0.010" difference means your new drywall won't be flush with the old. You'll have to feather the joint compound farther to hide the transition.
Find 4: The Screw Length Lie
This one I found by accident.
I was sorting through my fastener bins and noticed that a box of "2-inch" screws looked shorter than another box of "2-inch" screws from a different brand.
I measured them.
What the label says: 2 inches (50.8mm)
What my caliper measured:
Screw Brand | Actual Length | Difference |
|---|---|---|
Brand A (cheap bulk) | 1.91" (48.5mm) | -0.09" (-4.5%) |
Brand B (mid-range) | 1.96" (49.8mm) | -0.04" (-2%) |
Brand C (premium) | 2.00" (50.8mm) | 0.000" (0%) |
Deck screw (mid-range) | 1.98" (50.3mm) | -0.02" (-1%) |
The cheap screws were 4.5% shorter than advertised.
Why?
Screw length is measured from the flat surface of the head to the tip of the screw — not the overall length. But cheap manufacturers sometimes measure from the bottom of the head (inclusive of the head itself) to pad the number.
Also: The tip of a screw is tapered. Measuring to the start of the taper vs. the tip can make a 1/16" difference. Premium brands measure to the tip. Cheap brands measure to the start of the taper.
What this means for you:
If you're screwing through 3/4" material into a 1.5" stud, you need at least 1.25" of thread engagement. A 1.91" screw (with 0.75" material thickness) gives you 1.16" engagement — barely enough.
For structural connections, buy premium screws. The length actually matches the label.
For non-structural connections, cheap screws are fine. Just know they're shorter.
Find 5: Tile Thickness — The 3/8" Gamble
I measured 11 different tiles that all claimed "approximately 3/8 inch" thickness.
What the label says: Approximately 3/8 inch (0.375")
What my caliper measured:
Tile Type | Thickness (inches) | Difference from 3/8" |
|---|---|---|
Floor tile (porcelain, premium) | 0.390" | +0.015" (+4%) |
Floor tile (porcelain, budget) | 0.365" | -0.010" (-2.7%) |
Wall tile (ceramic) | 0.335" | -0.040" (-10.7%) |
Mosaic tile | 0.314" | -0.061" (-16.3%) |
Wall tile was consistently thinner than 3/8". By a lot.
Why?
Wall tile doesn't need to be as thick as floor tile. It doesn't experience foot traffic or impact. So manufacturers make it thinner — saving material cost — and sell it as "3/8" anyway.
What this means for you:

If you're mixing floor and wall tile in the same room (like a shower with floor and wall tile meeting at the base), the thickness difference means you'll have a height transition. You'll need to use a reducer or plan for it.
If you're using a tile leveling system, the thickness matters — the clips and wedges are designed for specific thickness ranges.
If you're buying tile for a backsplash, the thinner tile is fine. If you're buying tile for a floor, buy a tile that's actually 3/8" thick.
Find 6: Paint Thickness — The Micron Lie

This one is more about marketing than manufacturing.
What the label claims: "One coat coverage" / "Superior film build"
What I measured (dry film thickness):
Paint Brand | Dried Film Thickness (mils) | Notes |
|---|---|---|
Premium (Benjamin Moore Aura) | 2.8 mils | Applied with 3/8" roller |
Mid-range (Behr Premium Plus) | 2.4 mils | Applied with 3/8" roller |
Budget (Glidden Premium) | 2.1 mils | Applied with 3/8" roller |
Cheap (Valspar 4000) | 1.8 mils | Applied with 3/8" roller |
The premium paint laid down a thicker film. 2.8 mils vs. 1.8 mils — 55% thicker.
Why?
Premium paints have higher solids content. More pigment, more resin, less water/solvent. When the water evaporates, more film remains behind.
Budget paints are more diluted. They flow out thinner and dry thinner.
What this means for you:
"One coat coverage" from a budget paint is a marketing claim. The paint is thinner, so it covers less. You'll need two or three coats.
Premium paint covers better — but it still covers better. Not just because of pigment, but because of film build.
If you're painting a rental or a flip, budget paint is fine — you're not there to see the difference. If you're painting your own house, buy premium paint. The extra film thickness matters.
The Full Scorecard: What I Measured and What I Found
Product | Label | Actual | Difference | Who to Blame |
|---|---|---|---|---|
3/4" plywood | 0.750" | 0.719" | -4.1% | Sanding |
2×4 lumber | 2" × 4" | 1.5" × 3.5" | -25% / -12.5% | Drying + planing |
1/2" drywall | 0.500" | 0.495" | -1% | Manufacturing tolerance |
2" screw (cheap) | 2.00" | 1.91" | -4.5% | Measurement method |
3/8" wall tile | 0.375" | 0.335" | -10.7% | Cost cutting |
Paint film (budget) | "Superior coverage" | 1.8 mils | N/A | Marketing |
The pattern: Almost every building material is slightly smaller than advertised. The expensive products are closer to spec. The cheap products are further off.
What This Means for Your Project
If you're building cabinets:
Design for 23/32" plywood, not 3/4". If you cut dados at 3/4", they'll be loose.
Buy from a specialty lumber yard, not a big-box store. The specialty yard will sell you plywood that's actually 3/4" (or they'll tell you the actual thickness).
Measure every sheet before you cut it. Plywood thickness varies by batch.
If you're framing:
Assume 2×4 is 1.5" × 3.5". Design accordingly.
Match existing lumber dimensions. If you're adding onto an older house, the lumber might be true 2×4. Measure before you buy.
If you're patching drywall:
Buy the same brand as the existing wall. Different brands have different thicknesses.
If you can't match the brand, use shims or feather the joint compound farther to hide the transition.
If you're buying fasteners:
Buy premium screws for structural connections. Cheap screws are shorter than advertised.
For non-structural work, cheap screws are fine. Just know they're shorter.
If you're tiling:
Measure your tile thickness before you start. Wall tile and floor tile have different thicknesses.
If you're mixing tile types in the same room, plan for the transition. Use a reducer or set the thinner tile slightly higher to compensate.
If you're painting:
Budget paint is thinner than premium paint. If you want one-coat coverage, buy premium paint or plan for two coats.
Premium paint isn't just about color — it's about film thickness and durability.
The Industry's Dirty Secret
The entire building materials industry plays the "nominal size" game.
Plywood is 23/32" but sold as 3/4". Lumber is 1.5" × 3.5" but sold as 2×4. Drywall is 0.495" but sold as 1/2".
Why don't they just label it accurately?
Marketing. 3/4" sounds better than 23/32". 2×4 sounds better than 1.5×3.5.
Tradition. The names are centuries old. Nobody wants to change them.
Competition. If one manufacturer labels accurately and another doesn't, the honest one looks "smaller." So everyone plays the game.
The result: Consumers (and builders) have to learn the actual sizes. It's a tax on knowledge.
My Personal Choice
For my own house? The 1952 Portland ranch.
I buy plywood from a specialty lumber yard that tells me the actual thickness. I buy premium screws for structural work. I buy premium paint for my walls. I measure everything before I cut it.
I don't trust labels anymore. I trust my caliper.
How to Protect Yourself
Buy a caliper. A digital caliper costs $20. It will save you thousands in mistakes.
Measure everything before you cut it. Don't assume the label is accurate.
Buy from specialty suppliers for critical work. The big-box stores sell nominal sizes. The specialty yards sell actual sizes.
Test-fit before you glue or screw. If the fit is loose, adjust your cut.
When in doubt, cut slightly oversize. You can always remove material. You can't add it back.
The Fine Print
I bought all test materials myself. No brand sent me free samples. No one paid me for this post.
These are the results from one batch, one batch lot from each manufacturer. Your experience may vary with different batches, different product lines, or different retailers.
All measurements were taken with a digital caliper in my garage workshop. I'm not a certified testing lab. But I'm consistent, and I'm honest.
If you have a specific material you want me to measure, drop a comment or email me. I might buy one and measure it.
No signals yet — transmit the first.