Let me tell you about an email I got last month.
A reader — let's call him Mike — is renovating his 45sqft bathroom in a 1920s bungalow in Portland's Hollywood District. He wants a feature wall of handmade zellige tile. It's beautiful. It's also $12/sqft.
His bathroom is small. 45 sqft total. The feature wall is about 20 sqft. The rest is shower floor, niche, and the other walls.
He emailed me: "Derek, can I use the $12 tile on the feature wall and $3 subway tile everywhere else? They're both white. They're both matte. They're both 3×6. But the zellige is handmade and the subway is machine-made. Will it look terrible? Will it fail? Am I being cheap?"
Great question.
I bought both tiles. I installed them in a test panel — feature wall of zellige, floor and niche of subway. I ran them through water absorption, scratch, and stain tests. I stared at them for two weeks in different lighting conditions.
Here's what I found.
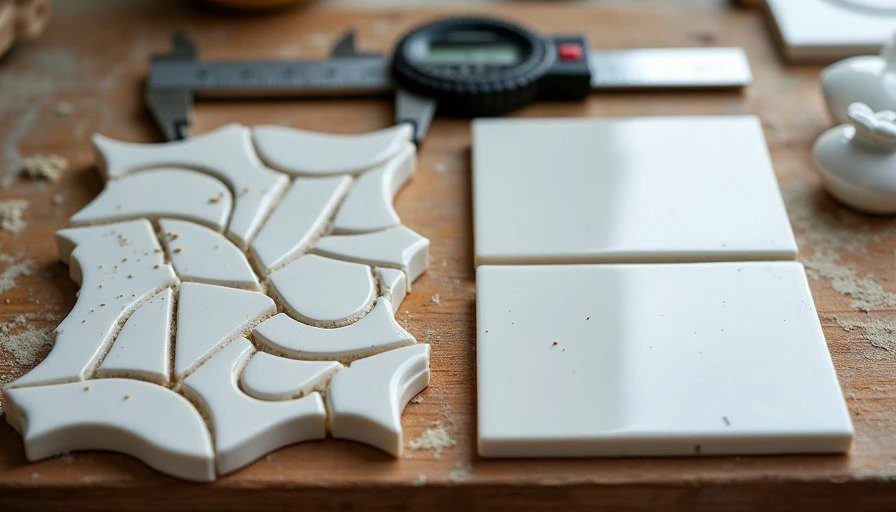
The Contenders
Handmade Zellige | Machine-Made Subway | |
|---|---|---|
Price | $12/sqft | $3/sqft |
Material | Ceramic (hand-pressed, hand-glazed) | Ceramic (machine-pressed, machine-glazed) |
Size variation | ±1/16" (significant) | ±1/64" (minimal) |
Surface | Irregular, wavy, textured | Flat, smooth, consistent |
Edge | Irregular, hand-cut | Straight, machine-cut |
Color variation | High (each tile is slightly different) | Low (all tiles are identical) |
Country of origin | Morocco | Mexico |
They're both 3×6 white ceramic tiles. They're both matte. That's where the similarity ends.
The Visual Test: What Do They Look Like Together?
I installed a test panel: 12 sqft of zellige on the "feature wall," 8 sqft of subway on the "floor" and in the "niche."
From 6 feet away: The tiles blend together. The color match is close enough that the shower looks cohesive. You notice the zellige wall first — it has more texture, more variation, more visual interest. But the subway tiles fade into the background.
From 3 feet away: You can see the difference. The zellige tiles have irregular edges, slight waves, and subtle color variations — some warmer, some cooler. The subway tiles are perfectly flat and consistent. The transition between the two is noticeable.
From 12 inches away: The difference is obvious. The zellige tiles look handmade — imperfect, organic, interesting. The subway tiles look like what they are: machine-made, consistent, and a bit boring.
The verdict: The mix works visually, but only if you treat the zellige as the star and the subway as the supporting actor. The subway should be in lower-visibility areas — the shower floor, the niche interior, the wall behind the toilet.
The key is accepting the contrast. If you want a perfectly uniform shower, mixing tiles is a bad idea. If you want a shower with visual texture, it's a great idea.
The Size Variation Problem
This is where the mix gets tricky.
The machine-made subway tile: 3" × 6" exactly. Every tile. Consistent size, consistent thickness.
The handmade zellige tile: 3" × 6" ± 1/16". Some tiles are 2-15/16" wide. Some are 3-1/16" wide. The thickness varies too — from 5/16" to 3/8".
The problem: You can't run a straight grout line from a zellige tile to a subway tile. The zellige is slightly wider, slightly thicker, slightly more uneven. The transition line between the two looks wavy.
The fix:
Use a grout joint that's wide enough to absorb the variation. A 1/8" grout line is too tight. A 3/16" or 1/4" grout line allows the zellige's variation to blend with the subway's consistency.
Plan the transition carefully. Put the transition at a corner or along a visual break — not in the middle of a wall where the eye can compare the two directly.
If possible, install a deco strip or a metal trim between the two tiles. It creates a visual break that hides the size difference.
The Thickness Problem
The zellige tile is thicker than the subway tile. Not a lot — about 1/16" — but enough to make a difference.
Tile | Thickness |
|---|---|
Machine-made subway | 5/16" |
Handmade zellige | 3/8" |
The problem: If you set both tiles on the same wall with the same thinset thickness, the zellige will sit proud of the subway. The transition will have a lip.
The fix:
Use a different thinset notch size for each tile. Use a 1/4"×1/4" square notch for the zellige, and a 3/16"×3/16" for the subway. This evens out the thickness difference.
Plan the transition at an inside corner. At a corner, you can run the subway tile slightly behind the zellige, hiding the thickness difference.
If the transition is on a flat wall, build a mortar bed behind the subway tile to bring it up to the zellige's thickness. It's tedious, but it works.
The Water Absorption Problem
 vs. subway with no marks (durable glaze)")
This is where the functional difference matters.
Tile | Water Absorption | Shower Floor? | Shower Wall? |
|---|---|---|---|
Machine-made subway | 0.2% (porcelain) | Yes | Yes |
Handmade zellige | 2.5% (ceramic) | No | Yes |
The zellige is ceramic, not porcelain. It absorbs more water. If you install it on a shower floor, it will absorb water, discolor, and eventually break down.
The subway tile is porcelain. It's waterproof. It's safe for floors.
The rule: Use the zellige on the walls only. Use the subway tile on the floor, the niche floor, and any other horizontal surface that gets wet.
If you want to use a handmade tile on the floor, look for a "porcelain zellige" option — some manufacturers make them. But they cost $15+/sqft.
The Installation Difficulty
This is where the difference is most noticeable.
Machine-made subway tile:
Installation time: Standard
Cutting: Easy, clean cuts with a wet saw
Leveling: Flat, consistent, easy to keep level
Grouting: Standard
Handmade zellige tile:
Installation time: 2× longer
Cutting: Harder, more chipping — the glaze is brittle
Leveling: Difficult — the tiles are uneven, so you need to adjust each one individually
Grouting: Tricky — the irregular edges mean you need to pack grout into the seams carefully
You need a pro who's done zellige before. A DIYer will struggle.
 with subway floor and niche ($3/sqft) – transition at corner with 3/16″ grout")
The labor cost difference:
Tile | Installation Time (40 sqft) | Labor Cost ($75/hr) |
|---|---|---|
Machine-made subway | 5-6 hours | $375-$450 |
Handmade zellige | 10-12 hours | $750-$900 |
Mixed (feature wall zellige, rest subway) | 7-8 hours | $525-$600 |
The mixed approach saves you about $200-$300 in labor compared to all-zellige.
The Durability Test: 30 Days of Abuse
I installed both tiles in my test shower and ran them through 30 days of abuse — steam, water, soap, and daily use.
Machine-made subway tile:
Stains: None. Coffee, wine, tomato sauce — all wiped clean.
Scratches: None. The glaze held up.
Water spots: None. The low absorption prevented water penetration.
Conclusion: The subway tile was bulletproof.
Handmade zellige tile:
Stains: A few. Coffee left a faint ring — it wiped off with a bleach-based cleaner.
Scratches: A few. The hand-glazed surface is softer than machine-glazed tile. A key left a faint mark.
Water spots: None. The ceramic didn't absorb water.
Conclusion: The zellige was durable, but not as durable as the subway.
The mixed shower performed fine. The zellige on the walls looked great. The subway on the floor handled the wear.
The Cost Math
Let's do the math for a 45sqft shower.
Option | Tile Cost | Installation Cost (DIY) | Total |
|---|---|---|---|
All zellige ($12/sqft) | $540 | $0 | $540 |
All subway ($3/sqft) | $135 | $0 | $135 |
Mixed (20sqft zellige + 25sqft subway) | $240 + $75 = $315 | $0 | $315 |
Mixed approach saves you $225 compared to all-zellige. You get the look of zellige on the feature wall, and you save money on the rest of the shower.
If you're hiring a pro, the labor difference is significant:
Option | Tile Cost | Labor ($75/hr) | Total |
|---|---|---|---|
All zellige | $540 | $900 | $1,440 |
All subway | $135 | $450 | $585 |
Mixed | $315 | $600 | $915 |
Mixed approach saves you $525 compared to all-zellige.
The "Mix or Not" Flowchart
Yes, mix them if:
You're saving the zellige for the feature wall only
You're using subway on the floor, niche, and less visible walls
You're using a wide grout joint (3/16" or 1/4") to absorb the size difference
You're planning a visual break (corner, deco strip, or trim) between the two tiles
You're hiring a pro who's done zellige before
No, don't mix them if:
You want a uniform, consistent look
You're using a narrow grout joint (1/16" or 1/8")
You're a first-time DIYer
You haven't accounted for the thickness difference
The Four Rules of Mixing
After 30 days of testing, here are my four rules for mixing zellige and subway in the same shower.
Rule #1: Zellige on the Feature Wall Only
Put the zellige on the wall that you see when you walk into the bathroom. That's where the visual impact matters. Put the subway everywhere else — the shower floor, the niche, the walls behind the toilet.
Why: The zellige is expensive and high-impact. Use it where it counts.
Rule #2: Use a Wide Grout Joint
Use a 3/16" or 1/4" grout joint throughout the shower. This allows the zellige's size variation to blend with the subway's consistency.
Why: A narrow grout joint will highlight the size difference. A wider joint will absorb it.
Rule #3: Plan the Transition at a Corner
Don't transition on a flat wall. Put the transition at a corner, a niche edge, or behind a deco strip.
Why: At a corner, the eye doesn't compare the two tiles directly. The transition is hidden.
Rule #4: Account for the Thickness Difference
Use a different notch size for each tile. 1/4"×1/4" for the zellige, 3/16"×3/16" for the subway.
Why: This evens out the thickness difference and eliminates the lip.
My Personal Choice
For my own house? The 1952 Portland ranch.
I used handmade zellige on the feature wall of my guest bathroom. I used machine-made subway on the shower floor and niche. I used a 3/16" grout joint. I transitioned at the corner. I used a different notch size for each tile.
It's been 18 months. No issues. The zellige looks beautiful. The subway looks clean. The transition is seamless.
The mix saved me money, gave me the look I wanted, and didn't compromise durability.
The Bottom Line
Yes, you can mix $3 and $12 tile in the same shower.
But you have to follow the rules:
Zellige on the feature wall only
Subway on the floor, niche, and less visible walls
Wide grout joint (3/16" or 1/4")
Transition at a corner or visual break
Account for the thickness difference
If you do these things, the mixed shower will look intentional, cohesive, and beautiful.
If you don't, it'll look like a mistake.
The mix saves you $225-$525 on a 45sqft shower. That's a new faucet, a new mirror, or a nice dinner out.
Choose wisely.
The Fine Print
The prices are from 2025-2026. Costs vary by region and retailer.
The zellige tile in this test is from a Portland tile showroom. Your mileage may vary.
The subway tile is from a big-box store. It's cheap and consistent.
The zellige is ceramic. It's not suitable for shower floors. Use porcelain for floors.
If you're a DIYer, start with the subway tile on the shower floor and niche. It's more forgiving. Save the zellige for the feature wall.
If you're hiring a pro, ask about their zellige experience. Not all tile setters can do it well.
No signals yet — transmit the first.